DIY diaries
Crayon lipsticks are hard to perfect but are a cheap alternative to Sephora brands
More stories from Erica Jones
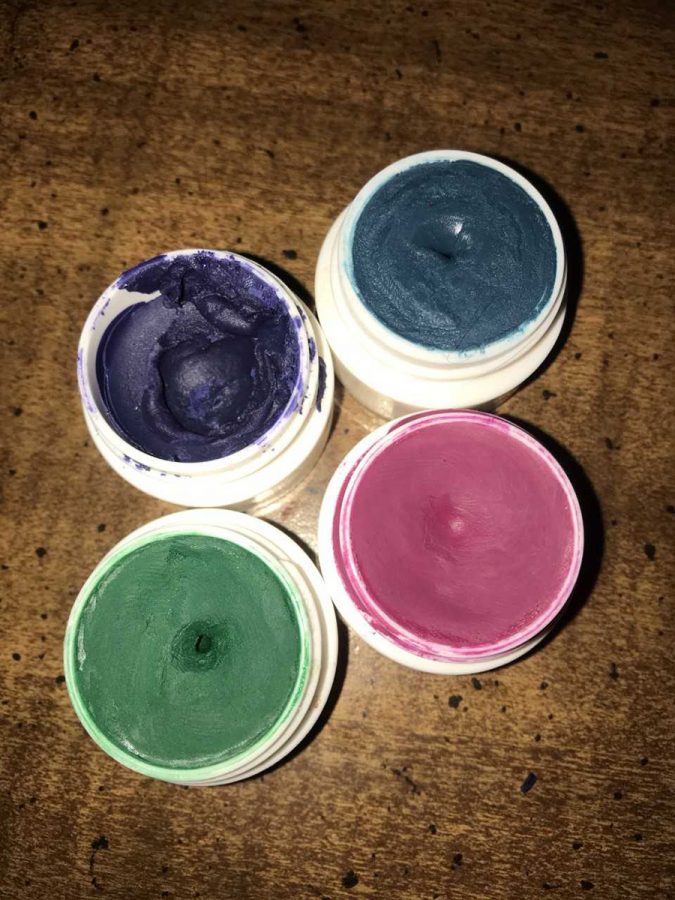
Photo by Erica Jones
Crayons make for decent-quality lipsticks, as long as you add a proper amount of coconut oil.
Pop artist Lizzo taught me all you need is some coconut oil, but a YouTube tutorial told me I also need crayons.
I’m into practical DIYs — things I can use daily or wear. So this week I tried my hand at the two-ingredient Crayola lipstick. I figured this project shouldn’t be too challenging, seeing as it was very minimalistic and wouldn’t cost a ton of money. In fact, I already had a jar of coconut oil and a few empty Carmex jars at my house, so all I had to do was pick up a 24-pack of non-toxic crayons from the store.
According to tutorials all across the internet, all you need for this project is a pot, some sort of glass container that fits inside said pot, crayons, coconut oil, something to pick up a hot glass container with and a container to hold your lipstick.
I’d like to add here that many of the tutorials I saw included pretty palettes of pinks and reds, but I figured if I was going to make lipstick from crayons, I wanted it to look like lipstick made from crayons. I’m talking unusual colors. Bold.
After filling the bottom of the pot with about an inch of water, I set my glass container (a mason jar) inside it and set my makeshift double-boiler on a fairly low temperature on the stove.
I then broke up my first chosen crayon — purple — so the pieces would fit in the bottom of the mason jar, measured out what I thought was half a teaspoon of coconut oil, mixed the two ingredients together and waited for them to melt. I’ll give you a hint on the coconut oil: It definitely was not half a teaspoon. It was maybe a quarter. Maybe.
When the two ingredients melted together, I poured the liquid into my Carmex jars using tongs and then an oven mitt to keep me from burning myself on the hot glass of the mason jar. Then I waited.
There’s definitely a learning curve with a project like this. It wasn’t until my third attempt that I figured out the best ratio of crayon to coconut oil, and I can’t even really tell you what that ratio is. It’s somewhere around two crayons to every rounded half-teaspoon of oil.
By no means would I call myself an expert. I would have liked to keep practicing, but a girl can only go through so many jars of Carmex so fast, so I only had five empty containers to work with.
Other things I learned include: Hot crayon wax hardens fairly quickly and will do so while you’re trying to pour it out of a hot glass jar. This is not a clean project at all; if your workstation is a mess, you’re probably doing it right. I thought I remembered peeling crayon labels off as fun, but it’s not.
Rubber tongs don’t mix well with steamy glass jars. If you try using them you might drop your jar back in the pot and suffer from the resultant burns of boiling water splashing everywhere.
You should wait until your lipsticks have hardened to touch them or you might end up with a weird finger-shaped hole right through the middle. It’s also important to let them harden before application because otherwise they harden on your lips and it feels funny and your mouth looks like a crayon.
If you’re a lipstick fanatic, you might not love this DIY unless you figure out how to perfect it. It takes a bit of trial and error to nail it, and even when you think you’ve got it right, you realize it just doesn’t match up to your favorite Sephora brands.
Of the four shades I attempted, one of them is still nothing more than a crayon, only now shaped like a Carmex container (remember the purple one that only had a quarter of coconut oil in it?); one (green) is pretty creamy but the coverage is lacking; another (violet-red plus apricot) is thick enough to apply like regular lipstick but feels almost tacky.
The last one, my favorite (blue-green plus gray), goes on smoothly and has great pigmentation and coverage, yet I’ve seen plenty of higher-quality products. The kicker? Those cost far more than a $2 box of crayons.
I didn’t long-term test any of the colors, so I don’t know how well they stay put over time, but I would suspect they’d fade fairly easily, especially after eating. However, the creation itself is quick, pretty fun, super affordable and so worth the effort.